Are you looking to add more replayability to your game?
Leaderboards are a long-standing feature of single-player games that give players a reason to play multiple times.
Who doesn't want to make it onto the top 10 list of their favorite game?
In this article, we will look at using Firebase and Rex Plugins to implement a leaderboard with no server-side programming for a Phaser 3 game.
The examples are in TypeScript and build on top of the Rocket Mouse game from our free Infinite Runner in Phaser 3 with TypeScript book.
Learn to make an Infinite Runner in Phaser 3 with TypeScript!
Drop your email into the box below to get this free 90+ page book and join our newsletter.
The majority of the leaderboard code will be in a self-contained Scene but we will reference some code from the Rocket Mouse project.
Installing Rex Plugins
There are several ways to install phaser3-rex-plugins. We will take the npm approach and import just the LeaderBoard class.
First, run this command to install the plugin to your project:
npm install phaser3-rex-plugins
Set Up Firebase Project
Create a Firebase account and project that will hold the leaderboard.
Head over to https://firebase.google.com to do that.
If you already have a Firebase project then you don't need to create a new one.
Create a web app in your project from the Project Overview section. Firebase will ask for a project name and then give you some code to add to your game.
We will use the CDN approach in this article but you can also install Firebase as an npm package and import it.
Add these script tags to your index.html:
|
|
The last thing we need is to initialize Firebase and we will do that in a Leaderboard Scene.
Create Leaderboard Scene
Let's start by creating an empty Scene with Firebase initialization at the top:
|
|
Most of the code here is given to you by the Firebase dashboard when you create a new project. You can also find it in Settings > Your apps.
Make sure you include the Firebase config values for your project on lines 8 - 14.
We use declare const firebase: any to let TypeScript know that a global variable called firebase should exist. This is the case because we are loading Firebase from the CDN. You won't need this if you are importing Firebase as a module.
Then we have a basic Scene that is given a key defined in the SceneKeys enum. It is from the Rocket Mouse project and looks like this:
|
|
You can also just use a string literal.
Create Rex Firebase Leaderboard
Let's import the LeaderBoard class from phaser3-rex-plugins at the top of the Leaderboard Scene like this:
|
|
Next, we will create a LeaderBoard instance and store it in a class property in the init() hook:
|
|
Notice that we are using the type any for the leaderboard property on line 5. This is a simple way to work around the lack of official support for TypeScript.
You can also create an interface based on the plugin docs.
We are expecting a data argument to be given with a score property. It will be used later when we go to save a score.
Then on line 12, we use the key 'leaderboard' for the root property. This will be the name of Firestore collection that stores each entry.
Lastly, we are using placeholder values to set the user on lines 16 - 19. Each of your players should have a different userID and userName.
One way is to use Firebase Auth to create and manage user accounts. Another way is to simply create a UUID and store it in a browser cookie. We won't be covering user accounts in this article.
Regenerator Runtime?
You might run into an error that says regenerator-runtime is not defined. It is talking about this library.
That can be fixed by installing it to your project with this command:
npm install regenerator-runtime
Then import it in the Leaderboard Scene:
|
|
Enable Firestore
You'll need to enable Firestore from the Firebase Dashboard before leaderboard data can be saved or retrieved.
Go to the Database section in Firebase and click the enable Firestore button.
You'll go through a wizard that asks about location and security. Select Test Mode for security. This will let you continue working on the leaderboard without having to figure out the proper security rules right now.
Save and Display Scores
We've done a lot of set-up so far and now we are ready to use the leaderboard.
Recall that we are expecting a score to be given in the init() hook. Let's store that value as a class property so that we can use it in the create() method:
|
|
Next, we can use this.newScore to save it to Firebase and then retrieve all available scores in create():
|
|
Notice we are using async to modify the create() method. This lets us use the async/await feature of TypeScript for more readable code when dealing with Promises.
The score provided to the init() hook is used on line 4 to save it to the database.
Then we retrieve the first page of scores and store it in the scores variable.
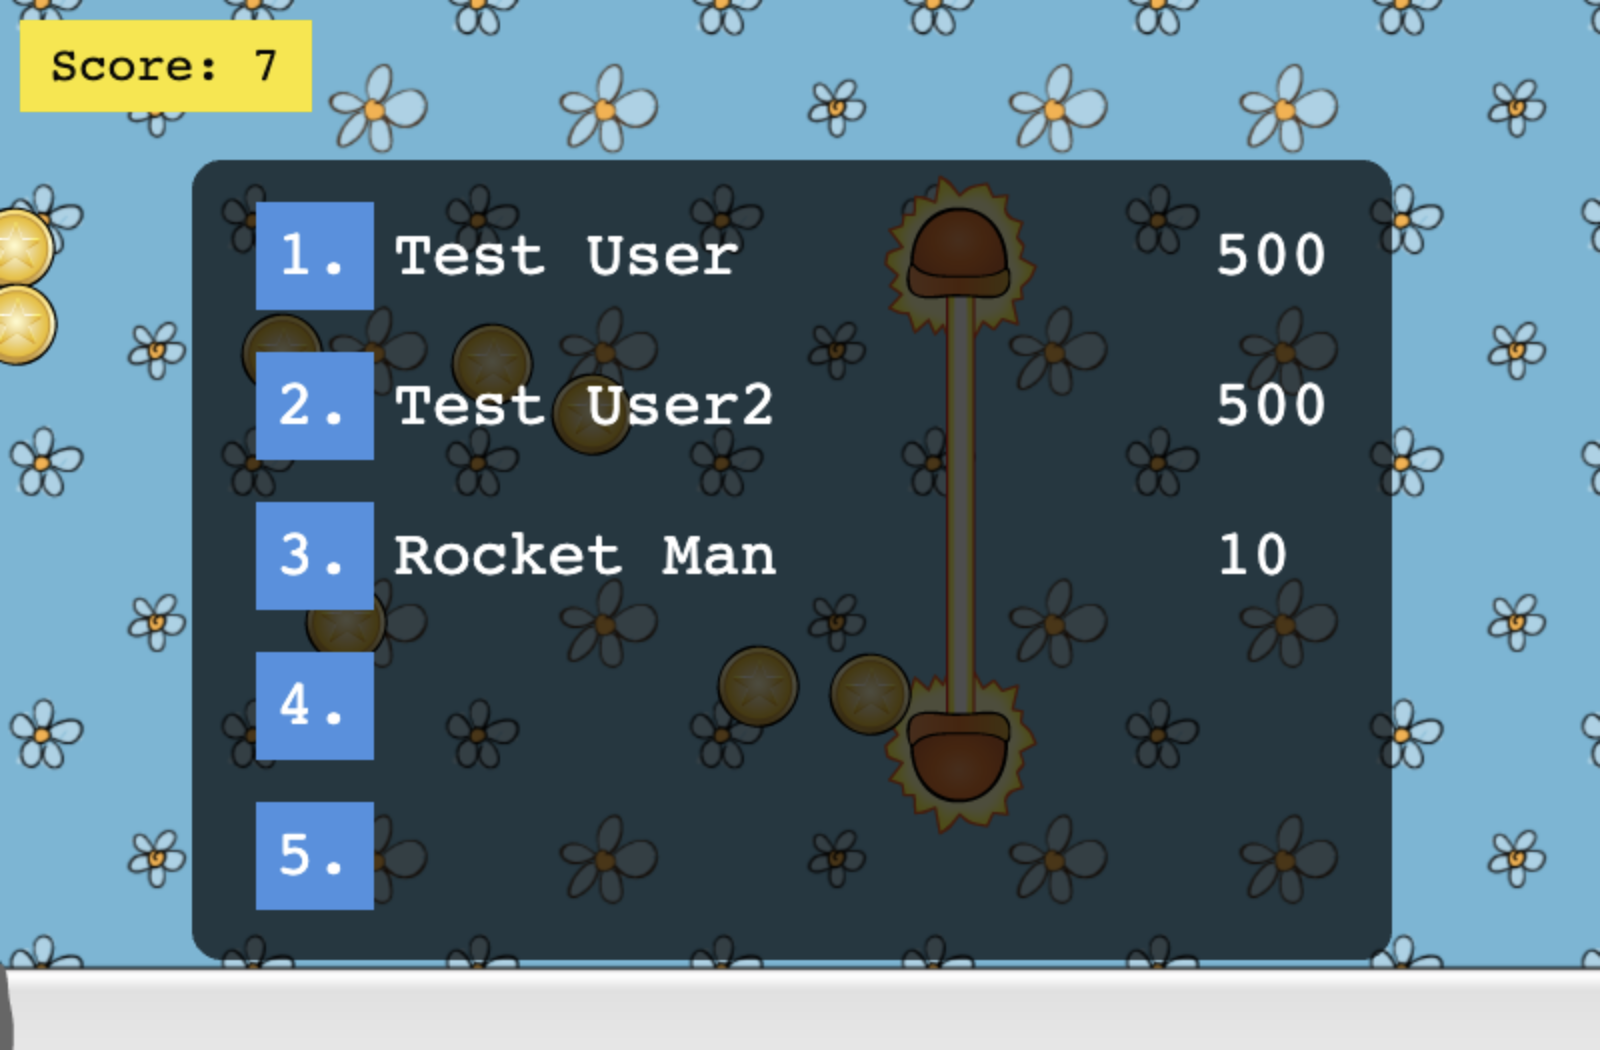
Next, we will display the top 5 scores instead of just logging them to the console:
|
|
There's a bit of code here but it is all fairly simple.
First, we create a translucent backing that the 5 scores will sit on top of.
Then, we use a for loop that displays a rank number on line 16. If there is a score for that rank we display the name and score.
Lastly, we increment y by 75 so that the next row begins under the previous row.
Quick tip: we used the Text Styler tool to design the rank number text.
It will look something like this:
Using the Leaderboard Scene
This section will differ somewhat depending on your project. We will be assuming the Rocket Mouse project mentioned earlier.
We want to run the Leaderboard Scene when the player has died. That can be found in the handleOverlapLaser method in the Game Scene.
|
|
This method is called when Rocket Mouse hits a laser obstacle and gets killed.
We run the Leaderboard Scene on line 13 and pass in the current score.
Notice that we check that the Leaderboard Scene is not already running before running it. An overlap can be triggered multiple times and we only want the Scene to run once.
In Rocket Mouse, the GameOver Scene is also run so we can adjust the y value of the message to be under the leaderboard like this:
|
|
The key change is that we use height * 0.9 on line 6 instead of the original height * 0.5.
Lastly, remember to stop the Leaderboard Scene when the game is restarted like this:
|
|
Next Steps
You now have a global leaderboard to let your players compete with each other for high score!
The leaderboard plugin has more features that you can find here. We are just showing 5 scores but you can add paging to show more.
Be sure to sign up for our newsletter so you don't miss any future Phaser 3 game development tips and techniques!
Drop your email into the box below.
Don't miss any Phaser 3 game development content
Subscribers get exclusive tips & techniques not found on the blog!
Join our newsletter. It's free. We don't spam. Spamming is for jerks.